
Standards
- Use American spelling and style (you may refer to The Chicago Manual of Style).
- Use ISO 15919 to transliterate Indic scripts into Latin characters.
- Enter only Latin characters (no other scripts). Exception: in dedicated fields, such as the "Name in local script" field.
- Don't use parentheses as part of a name or title unless they are officially part of the name (e.g., a Person name, a Print title).
- Don't use abbreviations or shortcuts unless extremely common.
Punctuation
- Follow this friendly punctuation guide.
- Don't use brackets [], angle brackets <>, braces {}, en dash –, em dash —, quotation marks ""/'', ellipsis ..., question mark ?, exclamation mark !. Exceptions:
- Use a punctuation mark when it is part of the value itself.
- Use brackets when a value is missing.
- Use quotation marks to enclose a name (of a source, of a place) inside a sentence.
- Don't add a space before: terminal point, pausing comma, ellipsis (when permitted).
- Don't add a space before or after: slash, hyphen.
- Add a space before: quotation marks, parentheses, after a terminal point, or pausing point (unless at the end of values).
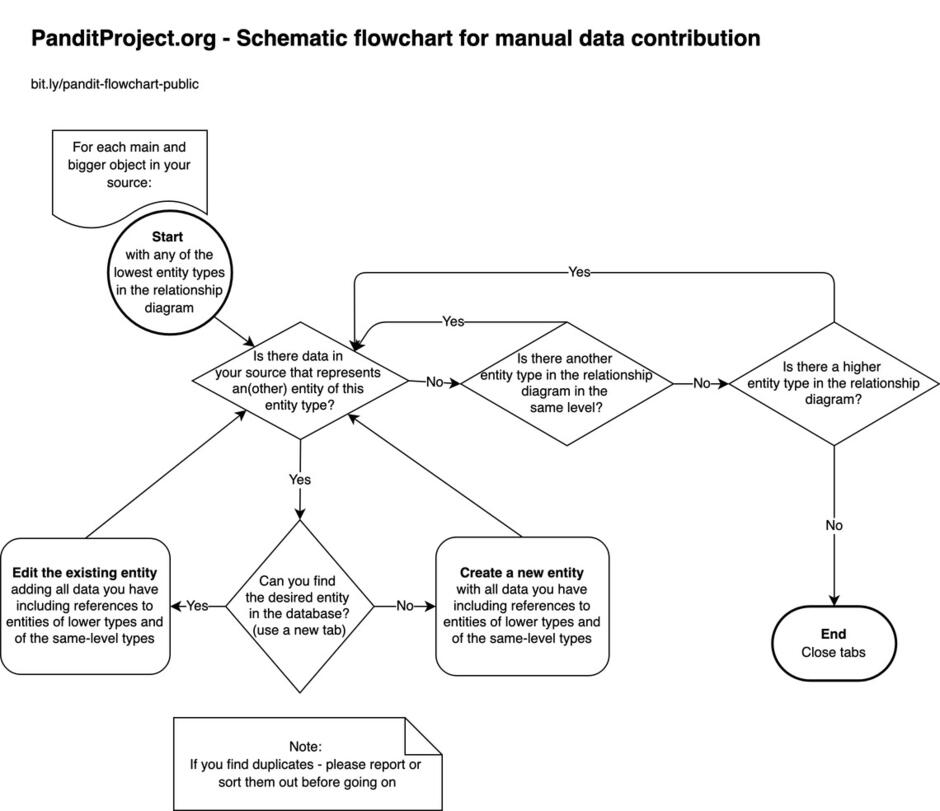
The order of data entry
IMPORTANT: Please gather, using your notes and sources, all the data you have about an entity before you actually edit or add it to the database. The system creates a new revision for each time you click the Save button. Entering all data at once prevents unnecessary revisions.
In order to connect an entity to another, you should first find out whether or not the other entity already exists in the database. If it does, you can go ahead and connect the two. You can also edit (correct or add data to the other entity while at it). If it doesn't exist (and please double check, as we are eager to avoid duplications!), please create it first.
Please consult the class diagram, which lists all the relationships among all entity types, in order to understand which type of entity you should create first. Generally speaking, you have to "climb up" the tree of the relationships. For example, if you are dealing with a work by a known person that was written in a known site, you should -- following the diagram -- start from the lowest of the three, which is the site. Again, you should check first whether the site exists in Pandit, and add it first if it doesn't. Then check if the person entity exists, and add it if it doesn't. Finally, do the same with the work entity itself.
Tip: If you can, go in a chronological order; for example, If you want to add data that one person knew the other, so usually the other person is older and should be in the database first.
Here is a flowchart that may help you. You can also see in on diagrams.net
Editing an existing entity
Each entity has its own page. At the top left of each page you can find the link Edit. Click it in order to launch the editing form.
Continue as explained below in the section on using the editing form.
Adding a new entity
For type Print, State, Site, Institution, Person, Work, MS Collection and Manuscript - hover the "Add data" global menu at the right top of the website and clicking the link of the relevant entity type. For the Extract type - click the "Add an extract" link located inside the relevant manuscript page. Once you click the link you are launching the editing form. Continue as explained below.
Using the editing form
Once you have opened the editing form, carefully go through ALL the fields in it so that you add or edit as much data as you can.
IMPORTANT:
- Read the help text under each field.
- Click the Save button; the system does not save the entity automatically.
- Click the Save button only once. Then wait for the page to refresh.
Note: See special widget types in the next info page.
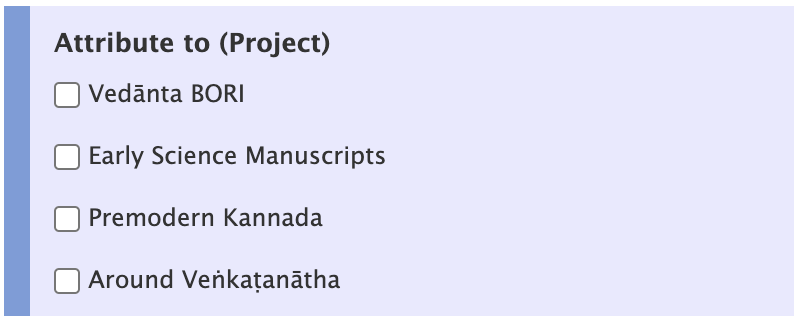
Attributing to a project
If you add data to an entity as part of working on a specific project then check the relevant checkbox under the field "Attribute to (project)".
Notes:
- You cannot remove an attribution to an entity, so make sure that you are attributing an entity to a project only when appropriate.
- The attribution to a project is only for this entity, not to related entities. This is to prevent false attributing to an entity that has nothing to do with your project.
Tip:
When you constantly work on a specific project, use the field "Automatic attribution to (project)" that is located at the bottom of of the settings form in your profile page - this will save you from once and again checking the checkbox of the project you work on for each and every entity.
Removing a value
If the widget includes a Remove button then click it:

However, if the widget does not include such a button then you have to select the entire value and delete so the widget will look empty:

Unpublishing an entity
When an entity is added, it is published by default. A user with an "Editor" role can unpublish an entity.
The system doesn't allow you to delete an entity. Instead, you can unpublish it. Do it when you find a duplicate of an object (two entities represent the same object in reality) or if the entity shouldn't be part of the database.
Before unpublishing, we have to clean up references:
- Remove any reference to any other entity. You do it by editing the entity that you want to unpublish.
Note: In case of unpublishing due to duplication, make sure that you copy all the values from all fields of the entity you want to unpublish (including links to other entities) to the entity you preserve. - Remove any incoming reference from other entities. You do it by editing any entity that references the entity that you want to unpublish.
Note: In case of unpublishing due to duplication, replace the reference to the entity you want to unpublish with a reference to an entity you keep published.
Once there are no references to or from the entity, click "Unpublish" and confirm.
Unless you have explicitly been asked to document the unpublishing somehow, you don't have to.
Typically, the system doesn't display unpublished entities. If you do wish to find an unpublished entity, go to the "Search" page and click on the "Advanced search" link. There, in the "Published" exposed filter, select the "No" option and click the "Apply" button.
Republish an entity
A user with an "Editor" role can unpublish an entity.
If an entity has been unpublished by mistake, you can republish it by clicking the "Publish" button and confirm.